Voucher copies - go to clients only when they are booked in an issue.
Complimentary copies - go to clients whether they have a booking or not.
Steps to add a voucher copies and complimentary copies to a client record
Step 1 - Open the client record > Select the Details tab.
Step 2 - Scroll down, you'll see boxes for Voucher Copies and Complimentary Copies. When you click in these boxes, you can select one or more of your publications. This sets up your client on the report to receive a voucher and/or complimentary copies for the publication(s) you select.
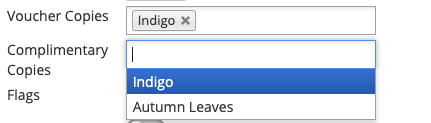
NOTE: It will always pick up the Primary Contact's Name and Address for the mailing.
Complimentary and Voucher copies spreadsheet
The Complimentary Copies report allows you to select one or more publications, and then produces a list of clients who are set up for a complimentary copy. Complimentary copies do not depend on whether a client is booked in to an issue (unlike voucher copies, which are for clients booked in to the relevant issue).
The Voucher Copies report allows you to select publication(s) and issue(s) and then produces a list of clients who are set up for a voucher copy and who are booked into the relevant issue.
From these reports you can download a spreadsheet or pdf with the contact details for the selected clients as explained in the introduction to MagManager reports.
Step 1 - Go to Reports on the top navigation bar.
Step 2 - Under Bookings you'll find 4 reports ‘Complimentary Copies’, ‘Complimentary Copies - Person First’, ‘Voucher Copies’ and Voucher Copies - Person First'. Select the required report.
Step 3 - Select the publications and issues from the drop-down box > Click View Report.

Step 4 - Click the Export icon and choose how you would like to download the report.
Address labels
The Labels reports (at the bottom of the Reports screen) let you produce print-ready labels for everyone on your voucher copy or complimentary copy list for the issue you select.

The label format supported is 3 labels across by 7 labels down on an A4 sheet- this format is widely available to buy for your office printer.
Select the report that you want. If you choose voucher copies or bookings, you will be asked to select the issue as well as the publication you want. Click view report.
IMPORTANT: To get your labels on the right format for printing, you need to click on the export button and select PDF. This will download a PDF in the right format to send to your printer.

You can then print the labels from the PDF document.
NOTE: If you have a problem with labels printing over the edge of the label on a 3 x 7 sheet. For example - the text is printing too far left and missing the first letter of each line of address.
You need to check your printer settings and adjust them to suit.
In most cases changing the Scale setting to - Fit to printable area should solve the problem. Otherwise it'll just be a case of playing around with your printer settings.
Steps to set a label identifier
If you have more than one publication, then to help you identify which address belongs to which publication(s), you can print a small initial letter on your labels -see the initial 'A; in the label screenshot below.

Step 1 - Go to the main settings page.
Step 2 - Under Publications & Bookings > Select Publications.
Step 3 - Select each of your publications in turn.
Step 4 - Select the Defaults tab, scroll down to the ‘Label identifier’ field, where you can enter an initial or other code, eg "A" for Autumn Leaves.


Step 5 - Labels for clients with a booking in the Autumn Leaves publications will now have a discrete letter 'A; printed on them.

